Starting version 2.5.2 of the Ziti Desktop Edge for Windows (ZDEW) and 7.5.4 of the Ziti Network, NetFoundry has launched the support for authentication of identities with IDPs via OIDC. This feature allows our customers to simplify the identity enrollment process and authenticate identities via the organization's IDP.
The IDP could be any OIDC compliant IDP such as Google, Auth0, EntraID, etc. Via the external JWT Signer functionality, authentication policies can be created in the network allowing IDPs to be the external JWT signers. Identites can be configured to authenticate via the authentication policy created for the IDP. Note that the identities are created with the default authentication policy unless a specific auth policy is selected.
In this guide we take you through the steps involved in setting up Microsoft Entra ID as an external authentication provider for a network and authenticating ZDEW with the authentication provider.
Prerequisites
- A NetFoundry Cloud Network that is up and running.
- An Entra tenant
1. Setting Up Microsoft Entra ID as IDP
A. App Registration
- Click on the "Entra" icon in the navbar:
- Click on the "App Registrations" item in the left navbar
- Click "Add" and then "App registration"
- Enter the Name of the application
- For the Supported account types, click the top option (single tenant)
- For the Redirect URI, make sure to select Public Client/Native and then set the following URL
http://localhost:20314/auth/callback - Register the application
- Save the Application (Client) ID as it will be required later for the configuring "Authentication" in the NetFoundry Console
B. Token configuration
- Click on the "Token configuration" item in the left navbar and click "Add optional claim".
- Select 'Access' as the token type, and select 'email', 'preferred_username' and 'upn' from the list of claims.
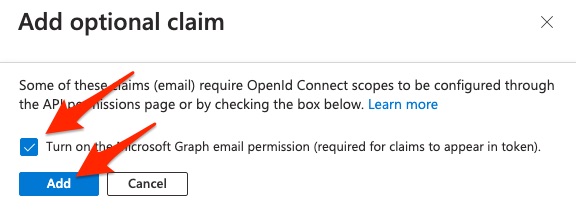
- Click the Add button at the bottom of the form. A form will then appear.
In the form that appears, select the checkbox Microsoft Graph email permission, Then click the Add button. This completes the token config.
For example:
C. Expose an API
- Click on the "Expose an API" item in the left navbar and click 'Add a scope'
- Set a name as
- Allow consent from Admins and Users
- Set the Display name and Description as needed
- Make sure the state is "Enabled"
- Click the Add scope button at the bottom of the form.
- Make a note of the 'Scope' : api://cd1d5602-<redacted>/openziti
- Click on "Add a Client Application" and then on ClientID, set the same value as the Application (Client ID) from the App we created, make sure to check the new scope created.
- Click on the "Owners" item in the left navbar and add the admin email as an owner of the application
D. API permissions
- Click on the "API permissions" item in the left navbar.
- Click 'Add a permission'. Select "My API's" and click on the Application you have created. The request API permissions window would pop up.
- Select the checkbox for openziti, then click the Add permissions button at the bottom of the form.
E. Manifest
- Click on the "Manifest" item in the left navbar
- Now click Microsoft Graph App Manifest, then scroll the JSON down to line 31 where you see 'requestedAccessTokenVersion'. This field defaults to 'null'. Change the value to '2'.
2. Setting up Authentication in NetFoundry Console
A. Gather IdP Information
- The openid-configuration endpoint URL for Entra looks like this: https://login.microsoftonline.com/<YOUR_TENANT_ID>/v2.0/.well-known/openid-configuration
- The value for <YOUR_TENANT_ID> can be found in the Overview tab of the Application you Registered.
- When you enter the openid-configuration endpoint URL into a browser, you will receive a response resembling the following:
- Take note of the issuer value.
- Take note of the jwks_uri value returned from the above openid-configuration endpoint URL.
- Take note of scope supported.
B. Create External JWT Signer
- You can access & manage the JWT Signers in the console by clicking the 'Authentication' icon on the left-hand side navigation menu.
- To add a JWT Signer, click on the
symbol at the top right of the page
- In order to setup the JWT Signer, we'll use below values gathered from the openid-configuration endpoint URL
- Issuer - 'issuer' value returned from the openid-configuration endpoint URL
- Audience - 'Application (client) ID' can be found in the Overview tab of the Application you Registered
- Client ID - 'Application (client) ID' can be found in the Overview tab of the Application you Registered
- Scopes - 'api://cd1d5602-<redacted>/openziti' [gathered in step 1-C], 'openid', 'profile', 'offline_access', 'email'
- JWKS Endpoint - 'jwks_uri' value returned from the openid-configuration endpoint URL
- JMap the JWT claim 'email' in the token that should be used to map against the unique 'External Id' on Identities.
- External Auth URL - 'issuer' value returned from the openid-configuration endpoint URL
C. Create the Authentication Policy
Authentication occurs when a client wishes to interact with the Controller. Read more about Authentication Policies & Ziti Authentication
- You can access & manage the Authentication Policies in the console by clicking the 'Authentication' icon on the left-hand side navigation menu:
- Click on the "Authentication Policies" tab on the top navigation menu
- Disable the certificate options & only use the JWT Signer as the Authenticator.
D. Create or Assign Identities(Endpoints) to the Authentication Policy
- In the Console, Create or update the Identities(Endpoints) by choosing the 'AUTHORIZATION POLICY' to match the policy created in step 2-C.
- Enter user email address associated with the Micrsoft Entra ID account.
- We have pre-added the identity attributes, which are configured in AppNet, to provide access to services for this Identity.
3. Adding the Identity
A. Obtaining the Network JWT
Adding an identity to a Windows machine, that uses an external provider as the primary authentication mechanism - with a JWT, requires the user to obtain a Network JWT.
The network's JWT can be downloaded from the console from the dashboard page.
Click on the Network JWT section to download a a Network JWT.
B. Adding the Identity
- With the JWT on the Windows machine to be added, click on the "ADD IDENTITY" button in the top right of the screen.
- After the context menu pops up choose "With JWT".
- In the file dialog, select the network JWT file obtained in step 3-A
C. Adding the Identity with URL
To add an identity to Windows ZDE by URL, first start by clicking on the "ADD IDENTITY" button in the top right of the screen. After the context menu pops up, select the "With URL" option.
For the URL information you will get it under Identity details in MOP console. If the OIDC Authentication details are not shown under the identities detail page, please contact our support.
- A dialog will appear. Enter a valid "https controller" url to a controller url field and click "Join network".
- The identity is added for your network leveraging an external provider.
- Once the JWT is accepted, a new identity will be added to the ZDEW.
- Initially, the identity will not be authorized and 'authorize IdP' will show up indicating the user needs to authorize via the external provider.
- For our set up we have configued single external provider for our NetFoundry Cloud network
- Click the blue arrow in the 'authorize IdP' icon.
C. Enroll Identidy with Entra ID
- Select the OIDC provider and mark it as default.
- Click 'Authenticate With Provider'
D. Authenticate with Entra ID
- This will begin the Auth Flow with PKCE process. During this time, the ZDEW will be listening on port 20314.
- You will be directed to authenticate with Entra ID.
- After successfully completing the authentication with the external provider, which is Microsoft Entra ID in our case, the browser will redirect to the listening port and complete the authentication flow.
- The user will be shown a screen that looks similar to this. The first time this screen is shown in a browser session, it will not automatically close. Subsequent authentication events should result in the tab automatically closing.
E. Authenticated Identity
- Finally the user will see the services loaded as shown by an authenticated identity.